
Git Güd
In the introduction we learned what Git is, how to install it, and how to set it up. Now It’s time to roll up our sleeves and start putting Git to work.
Initialize A Project
After the Git application is installed and configured, it is possible to initialize a project. This step essentially creates the structure needed to engage in the basic Git loop. It is possible to initialize a project either on an empty directory, or a directory with a bunch of code already in it. The initialization step adds a (hidden) “dot” folder to the directory. This folder must be placed in the code project’s root directory to track all items. To initialize a project, navigate to the desired project root directory and run the command,
$ git initRunning the git init command in an example project root called my-project creates a .git directory with the following structure;
~/MyPrograms/my-project $ tree -a.├── .DS_Store├── .git│   ├── HEAD│   ├── config│   ├── description│   ├── hooks│   │   ├── applypatch-msg.sample│   │   ├── ...│   │   └── update.sample│   ├── info│   │   └── exclude│   ├── objects│   │   ├── info│   │   └── pack│   └── refs│       ├── heads│       └── tags├── config│   ├── config1.txt│   └── config2.txt└── src    ├── test1.txt    ├── test2.txt    └── test3.txt
11 directories, 24 files
Project Components
(Coming soon)
Don’t worry about what the components are yet. Just know that the Git project is now ready to track the project! From here we are free to start developing and engaging in the basic Git loop.
Working With Git
The primary output of Git as a version control tool is a series of “snapshots” of the code. The snapshots represent the codebase at an identifiable moment. We’ll get much more in-depth with these snapshots later, but for now, just know that each snapshot is represented by a “commit”. Each commit is identified by a secure hash algorithm digest output, otherwise known as a SHA value. We can use these SHA values to reference the commit. Before anything is committed, however, Git allows us to organize our working changes in ways that make it easy to deal with the commits. That is to say we can selectively build commits from a series of tracked changes. Having organized commits is useful when something goes wrong, and we need to isolate the change.
Git tracks changes, but doesn’t actually contain any code. Git is more like a series of linked tags represented by SHA values. The SHA values are calculated from the code itself, but do not actually contain any code. The repository, that is to say the actual file directory that contains the Git project structure actually contains the code. Git just represents the codebase through binary large objects (blobs) and trees (data structures). A commit is known as a tree-ish because it is a
Basic Git Loop
The main loop involves a “three tree” architecture. That is, there are three fundamental trees, or states, that a particular Git project goes through for a single complete loop cycle. Visually it’s easier to represent a single loop lifecycle as four stages, but just imagine that the first and last state are essentially the same, and just represent different commits. We also skip the first iteration of the Git loop because it is a little non-standard. Don’t worry, we’ll come back to it once we understand all the pieces involved.
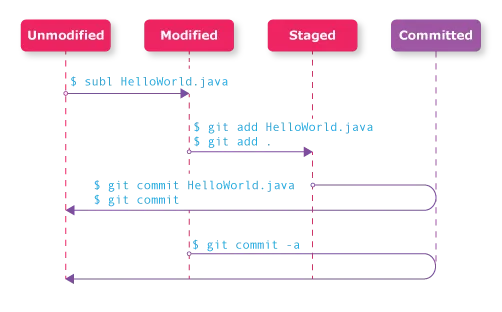
Git States
There are really three states to this loop because “unmodified” and “committed” are essentially the same thing, aside from being one “snapshot” version apart. For illustrative purposes we differentiate the “unmodified” and “committed” steps here.
Unmodified/Committed
If everything is committed and no further changes exist, the project is said to be “clean”. This is a static, happy equilibrium where all changes are saved and accounted for.
Modified
Once we get working and start saving changes to files that Git tracks, Git will recognize that changes exist. The changes cause Git to mark these files as “modified”. In Git terminology the modified files exist in what is known as the “working tree”. The working tree indicates that files have been changed. There is no Git command to move files into the working tree. Simply modifying tracked files earns them this flag.
Staged
After we’ve been working for a while, we can start to think about the commit we want to build. From the working tree, we can select changes we want to add to the commit by adding those changes to the “staging index”. Only changes listed in the staging index will be committed, and all changes still in the working directory will remain simply as a tracked changes. The add command is used to stage files. We’ll talk more about this command later.
Unmodified/Committed
Finally, after all updates are staged, changes are committed to the repository. At this point, if all changes have been committed, the project goes back to existing in a “clean” state, and we can start the loop all over with files that are now back to being considered “unmodified”. Naturally, changes that exist in the working tree that were not staged still exist in the working tree, ready to be staged and committed themselves. Commits should be “atomic” in that each set of changes committed to the repo should be thematic. Atomic commits help with both logging and figuring out where a particular bug may have appeared. When in doubt it is better to make smaller, more frequent commits that affect only a single aspect than large commits that encompass many different changes. Commits are performed via the commit command. We’ll talk more about this command later.
There are a couple details to add about the basic loop.
- It is possible to skip the staging index and commit changes directly from the working index, but staging makes commits easier to manage.
- The first iteration of the basic Git loop is a little non-standard because it deals with the notion of “tracked” vs “untracked” files. This is covered in the next section.
Tracked vs Untracked Files
Every file/directory that is created/added to a Git project will automatically show up as an untracked file in Git. Commits only include changes for tracked files. The distinction between “untracked” and “tracked” can be a little confusing due to Git’s basic awareness of the project. Even without any explicit tracking Git is aware of changes to the basic structure of the project. E.g. Git is aware of when files/directories are added or removed, but that’s about as far as Git’s default awareness goes. Untracked files can hang out indefinitely and be freely modified, but they can make the process messy, so it’s best to do something with them sooner rather than later. Untracked files/directories can be either tracked by the project or ignored. To enter the basic git loop, untracked files need to be tracked. To track files/directories simply add them to the repo. This moves them from an untracked state directly to the staging index. After the initial commit, the newly tracked files can enter the basic git loop in an unmodified or “clean” state. See the next section on Staging Files for more detail. To ignore files/directories, see the Ignoring Files In The Repository section further below.
Before we get any further, lets talk about the status command. This command returns a basic picture of the Git project. The status command lists staged, working tree, and untracked items (in that order). The example below shows several details of the status command. First, note that not all files in the repo are shown. This command only really shows changes to the Git project. Secondly, note that the command also differentiates new files and modified files in the staging index. The status command does not show any individual edits. For individual edits, see the section on diff below.
$ git statusOn branch mainChanges to be committed:  (use "git restore --staged <file>..." to unstage)  new file:   README.md              #Newly added file staged for commit  modified:   HelloWorld.java        #Updated file staged for commit
Changes not staged for commit:  (use "git add <file>..." to update what will be committed)  (use "git restore <file>..." to discard changes in working directory)  modified:   test.txt               #Modified file in working tree
Untracked files:  (use "git add <file>..." to include in what will be committed)  test-output.txt                    #Untracked file
The Working Index
There is no command to place files in the working tree. Files appear in this tree if they are tracked and have been modified.
$ git statusOn branch mainChanges not staged for commit: (use "git add <file>..." to update what will be committed) (use "git restore <file>..." to discard changes in working directory) modified: HelloWorld.javaThe Staging Index
Staging Files
Files are most commonly staged from the working tree, but files and directories freshly added to the Git project are also staged from an untracked state. It is possible to add files to the staging tree individually, or add the entire directory with the addition of a simple . option. To add individual files run,
$ git add HelloWorld.javaor, to add all files in the directory,
$ git add .NOTE: By default, Git doesn’t track empty directories. To track an empty directory, the best way is to add a dummy “dot” file such as .gitkeep to the directory. See the margin note on .gitignore files for more information about tracking.
Unstaging Files And The —restore Command
Once files have been added to the staging index, they are ready to be committed. If we want to remove files from the staging index to only include specific files for a customized commit we can unstage files. To unstage files use the restore command with the --staged/-S option. This option moves tracked changes to the working directory where they can continue to be modified or staged as part of a later commit.
The restore command restores specified paths in the working tree the contents from the specified restore source. This makes it possible to either untrack also restore changes in the working directory. If you made a bunch of modifications to a file and want to start over, simply use the restore command with the -- / --worktree / -W option to revert the working directory toIf a path is tracked but does not exist in the restore source, it will be removed to match the source. The restore command is used in place of the overly broad checkout command.
To restore changes made to files in the working directory (--worktree), add a tree option of -- / --worktree / -W. This deletes changes made to the file.
$ git restore -W fileName.txtThe restore command also works to un-stage files by specifying the --staged or -S option for the tree variable.
$ git restore -S repo/fileName.txtThe location options can be combined as -WS which will undo any edits made to working directory files, as well as unstaging staged edits and undoing edits made to those files as well. This essentially restores files and states to the last commit state.
$ git restore -WS repo/fileName.txtNavigating The Git Project
List Files In A Repo
To list all files and directories tracked by Git from within the repository, use the ls-tree command. Results are classified as either tree (directory) objects or blob (binary large object, otherwise known as files).
$ git ls-tree <tree-ish> [<path>]
which may look something like the following,
$ git ls-tree HEAD directory/It is also possible to use the -r option to continue the listing process recursively for all trees/subdirectories. This is super helpful for seeing a wider structure of tracked files in the repo.
$ git ls-tree -r HEADView Changes And Edits
The status command only shows which files have been edited. To view the changes that were made, use the diff command. To view changes made between files in the staging (cached) directory and the repo, add the --staged (or --cached) option. Add the --color-words option to highlight just the final state change,
$ git diffor
$ git diff --staged --color-words fileName.txtGit diff also allows us to view the difference between any two commits by listing the older commit first.
$ git diff <old commit hash>..<new commit hash>
or even
git diff <old commit hash>..HEAD for the latest commit.
Perhaps you want to see the difference between two repos. This action prints the difference between a tracked remote and the current local main. It will print what has been added to the main branch that does not yet exist in the remote.
$ git diff --color-words origin/main..mainCommits
Once we’re done editing and staging all the changes to the content of the repo, and we’re ready to save the changes to whatever particular branch we’re working on, we need to commit those changes to create an updated version, along with a brief message about what the changes include. Each time a commit is made, Git takes a snapshot of the changes and hashes them to create a SHA-1 string that is used to identify the commit. Each SHA-1 value consists of a 40-character string. These SHA-1 values, hashes, or simply “SHAs” are used to identify specific versions of the project and are an important part of navigating the Git workflow.
Making Commits With commit
While not strictly required, each commit should include a message briefly detailing changes contained in the commit using a present tense. Because commit messages show up when referencing commits, think of the first line like a headline. A good message headline is short at <50 characters. Longer messages can be included, but should start with a short headline, then a blank line, then the detailed message, though keep all lines <72 characters. Messages can include bullet points with asterisks/hyphens, and include pertinent information like ticketing numbers, etc. Messages can be included with the -m option, or by setting up a default editor (see Configuration section for more details on external editors)
$ git commit -m "Commit message content"or when used with an external editor configured, no -m option is necessary
$ git commitIn situations where we want to add (stage) and commit all changes, it is possible to use a single command. This command does not include untracked files.
$ git commit -aView The Commit History
The log can be useful in checking the change history as well as figure out author information, commit messages, and more. The commit log references commits by hash digests of all changes and metadata made in the commit. This ensures data integrity. Each commit also contains a HEAD pointer which indicates where the commit history left off within the current repository. Use git help log for more information about the log. To view the log, use the log program.
$ git log <options> <pathspec>
Commit Log Filter Options
One of the most powerful tools is simply to enter the file/directory that has been changed. This option must be placed at the end of the command line.
$ git log HelloWorld.javaUse the -<number> option to show only the number of commits in relation to the HEAD. For example git log -2 shows the two latest commits. Additionally, there are a few handy modifiers to narrow log results.
--after=<YYYY-MM-DD>--since <YYYY-MM-DD>--before=<YYYY-MM-DD>--author="Peter"
Git also uses grep to globally search for regular expressions, including string with the --grep=<string> syntax.
$ git log --grep="issue 3346"Commit Log Format Options
Use -p or “patch” to format the log to show all the changes made in each particular commit. The example limits results to the last three commits.
$ git log -p -3Alternatively, use the --stat option to list line changes by insertions(+) or deletions(-) to the files listed and file name changes. The --stat option does not show the exact changes. Each line change is represented by a single character. If there are two characters, two lines changed.
$ git log --stat -3 --onelineUse --format / pretty=<format/string> with either pre-programmed formats such as medium (default), reference, fuller, or raw. There are also several options that provide shortcuts to common combinations, such as --oneline which is the same as --pretty=oneline --abbrev-commit.
$ git log --format="%h%n%an | %aD | %cr%n%s%n"$ git log --oneline$ git log --after=2022-10-20 --format="%h%n%an | %aD %n%s%n"Use the --graph to format the results as a graph for their respective branches.
$ git log --graph --all --oneline --decorate -3View Specific Commits
Commits can be referenced by their entire 40-character hash string, but Git is smart enough to use far fewer characters. Specifically, they require at least 4 characters, but for safety, It’s good to use 8-10 characters. To see a specific commit, use the show command.
$ git show fj9823jfTo see a particular commit’s parent, use the ~ or ^ character. The ^ character may be more common for a couple generations of commits, but the ~ is more flexible because it allows the user to specify the number of generations with the <sha>~N format. For example, git show fj9823jf^^^ and git show HEAD^^^ can be expressed more elegantly as,
$ git show fj9823jf~3 and git show HEAD~3Removing vs Ignoring Files
Removing files refers to properly moving/deleting files from a repo. Ignoring files involves configuring the project not to track, aka ignore files in a repo. Why might you want to simply ignore a file in the repo instead of deleting it? Well, it could be really any file that is not required for the code to function. This could be a temporary file, or be the result of a particular process that creates a localized artifact that we want to reference or update locally, or maybe even an item that is not necessarily appropriate to share externally. GitHub has some useful .gitignore templates on their gitignore page. Examples of files to ignore include,
- Compiled source code
- Compressed files
- Logs
- Databases
- OS-generated files
- User-uploaded assets
Deleting tracked, untracked, and ignoring files each have their own workflows and specifications.
Removing Untracked Files
Untracked files do not need special treatment and can simply be moved out of the project directory or deleted. There are a handful of ways to do this, including using the GUI to right-click and delete a file, or in the CLI via mv or rm commands. Git also has its own clean command to remove untracked files. The clean command has some quality-of-life features that make it handy. For example, while both rm and clean commands delete files, the clean command only deletes the files if they are untracked while rm will remove the file regardless of its status. The clean command also allows for batch execution. When using the clean command, execute a dry run using first to get a list of files that the command will remove. Use the -n option with clean to perform a “dry run” to print files that would be removed if a real command was given. Use the -f option to actually clean the directory.
$ git clean -n #"dry run" to expose which files will be removed$ git clean -f #The final commandRemoving Tracked Files
Removing or deleting tracked files are slightly different because even after the file is moved/deleted, it remains tracked by Git. It is possible to delete a tracked file using the git rm -f <fileName> command, but to delete the record, the removal also needs to be committed. Note that using the git rm command on tracked files requires a -f option to “force” the deletion.
$ git rm -f text.txtrm 'test.txt'
$ git statusOn branch mainChanges to be committed:  (use "git restore --staged <file>..." to unstage)  deleted:    test.txt
$ git commit[main 539030e] deletes test.txt 1 file changed, 0 insertions(+), 0 deletions(-) delete mode 100644 test.txt
$ git statusOn branch mainnothing to commit, working tree clean
Ignore Files In The Repository
-
To ignore files, we will need to create a .gitignore file in the project root directory. Note that the .gitignore file is placed in the project root directory, not in the .git directory.
~/MyPrograms/my-project $ touch .gitignore~/MyPrograms/my-project $ tree -a.├── .git│ └── ...├── .gitignore├── config│ ├── config1.txt│ └── config2.txt├── logs│ ├── log1.txt│ ├── log2.txt│ └── log3.txt└── src└── test.txt -
Add desired rules to the .gitignore file and save it. The .gitignore file can take both file names and expressions which use patterning to ignore certain files in the repository. The expressions recognize
*(wildcard),?, [character sets], and [number ranges]. If we want to ignore all files in the logs directory that end in.txt, we’d insertlogs/*.txtinto the .gitignore file. If we want to make exceptions, we could insert a negative expression like!logs/log1.txtwhich would track log1.txt despite the previous rule ignoring all files in the logs directory with .txt extensions. To ignore all assets in a directory, simply name the directory and end in a/. Soconfig/would ignore all files in the config directory. The .gitignore files also includes the ability to add comments via the#character. Commenting what you’re ignoring can be super helpful later when you forget why you did not want to track a file/directory. It is often recommended including ignore files on the project level so that way they are passed between users. After we’re done making the desired changes to the .gitignore file, simply save it.Terminal window #Ignore all configuration filesconfig/#Ignore all txt-based log files but not the first loglogs/*.txt!logs/log1.txt#Ignore my private usage notesREADME.md -
Purge the cache that contains the trackers for the config files. If we preemptively add a file to the .gitignore file, saving and committing it will effectively prevent the Git project from tracking it. However, if the file is already tracked, we need to purge the cached record of the item(s). It doesn’t really matter if the cache is purged before or after the .gitignore changes are committed, but purging before reduces the number of commits we have to do. Without purging the cache changes to (previously) tracked files will persist in the change log.
To purge the cache use
git rm --cached. The cache can either be purged selectively by naming paths, or collectively using the.option. Use the-roption to recursively purge all files within a named directory. Note that any files we intend to track whose cache is purged will need to be added afterwards. Following the example .gitignore addition above, targeting either the logs/ directory or the entire.directory results in a logs/log1.txt file that will need to be re-staged/committed after this process because its tracker has been purged.$ git rm --cached config/ logs/ -rAlternatively, and probably an easier workflow is to remove the entire cache from the project’s root directory and simply stage everything according to the updated .gitignore file before committing everything. Make sure the project is clean before doing this step.
$ git rm --cached . -r$ git add . -
Commit the changes. After purging the cache, all the changes still needs to be staged/committed.
$ git commit -a #Stages and commits the .gitignore addition$ git commit #If the entire cache is purged and re-added
NOTE: It is also possible to --amend the previous commit to fold the new ignore in with the last commit.
Putting It All Together
By this point we’ve collected a few commands. Let’s put them together into an example workflow.
-
Starting a new code project from scratch can take many forms including an
npmbuild command for a front-end project, or amvnbuild command for a Java project among many examples. After the project is established, navigate to the project’s root directory and run a Git project initialization command,$ git init -
Create, edit, and save files to your hearts content! This is where the real work happens. Use the
touchormkdircommands in terminal to make files and directories (respectively).$ mkdir src$ cd src$ touch HelloWorld.java Test.java$ subl HelloWorld.java -
Track/add files. After a file is created, it needs to be tracked. Tracking and untracking files happens once, after which Git remembers whether the file is tracked or not. When a file is time a file is tracked Git automatically stages it. After the first commit the file remains tracked. Each time the file is changed it needs to be re-added to the staging index before it can be committed. To move files from the working tree to the staging tree use the
addcommand. It’s possible to either specify a file name (optionally listing multiple files separated by space) or use the.to indicate that we want to track all files in the directory,$ git add HelloWorld.java Test.javaOR$ git add . -
Commit the file. After all desired files are staged it’s time to commit them to the repo. Use the
commitcommand with either specific file names or alone to commit all files in the staging tree. It is also possible to se the-aoption to stage and commit files directly from working directory, skipping the staging tree.NOTE This option catches ALL files in the working directory and commits them. If you want to commit only select files, use the
addancommitprocess previously outlined.$ git commit HelloWorld.java Test.javaOR$ git commitOR$ git commit -a -
Once everything is committed, we can push to the remote. The first time we do, we will need to set the branch,
$ git push -u origin mainAnd every time after that, so long as the
HEADis being tracked, we can simplypush,$ git push